
For Employees
Can’t log in to the app: what to do
If the Clockster app won’t let you in, find the message you see on the screen below and follow the steps.
1. «Account does not exist or the password is incorrect»
Check your phone number. Enter it in international format, with the country code. For example, for Kazakhstan: +7 777 123 45 67. Extra digits, spaces at the start, or «8» instead of «+7» are common causes of this error.
Forgot your password? On the login screen, tap «Forgot password?»:
by email — you will get a link to set a new password;
by phone — the code is sent via WhatsApp; if it doesn’t arrive, by SMS or a phone call.
Code not arriving? Wait 2–3 minutes: WhatsApp or the mobile operator sometimes delay messages. If you request the code many times in a row, sending may be paused for a while — try again later.
No account yet? Then you haven’t registered. Tap Sign up, enter your name and the same phone number you gave your administrator. Then enter your company’s invitation code.
Important. An account and an employee profile are different things. The administrator creates your employee profile in the company, but you create the login account yourself. One account can work in several companies.
2. «This phone number is already registered»
If you are an employee: you already have an account. Don’t register again — just log in. If you don’t remember the password, tap «Forgot password?».
If you are an administrator and see this message when adding an employee:
Open Employees and search for the person by phone number.
Check the Former employees tab — an old profile may still be there. Restore it instead of creating a new one.
If you find two profiles for the same person, keep one and delete the other.
3. «This device is already used by user…»
Only one employee can be linked to one phone. This happens if the phone used to belong to someone else, or if you logged in on someone else’s phone.
What to do: ask your administrator to unlink the device.
The administrator opens Employees → the employee’s profile.
In the Mobile phone (or Device) line, they tap the trash icon.
If the message names another employee, the device must be deleted in that employee’s profile.
This can be done both in the web version and in the administrator’s mobile app.
4. You changed your phone
If you have a new phone, the app may not let you in while the old phone is still linked to your profile. You can’t unlink it yourself — the administrator does it the same way as in step 3: Employees → your profile → the trash icon next to the old phone. After that, log in on your new phone.
Still not working?
Contact your company administrator or write to Clockster support. Include your phone number and a screenshot of the error — this helps us solve it faster.
What can I do in the “Announcements” section?
The Announcements section is where the company publishes important news, updates, and notifications for employees.
What you can do in the “Announcements” section:
Read corporate news and management messages
Receive push notifications about new posts
View the full announcement text directly in the app
Participate in discussions: leave comments and ask questions
See who has already read the post
Examples:
Meeting notifications
Holiday greetings
Information about new rules or project
👉 In short, Announcements serve as the company’s internal news feed, helping employees stay informed about important events.
How can an employee check worked hours?
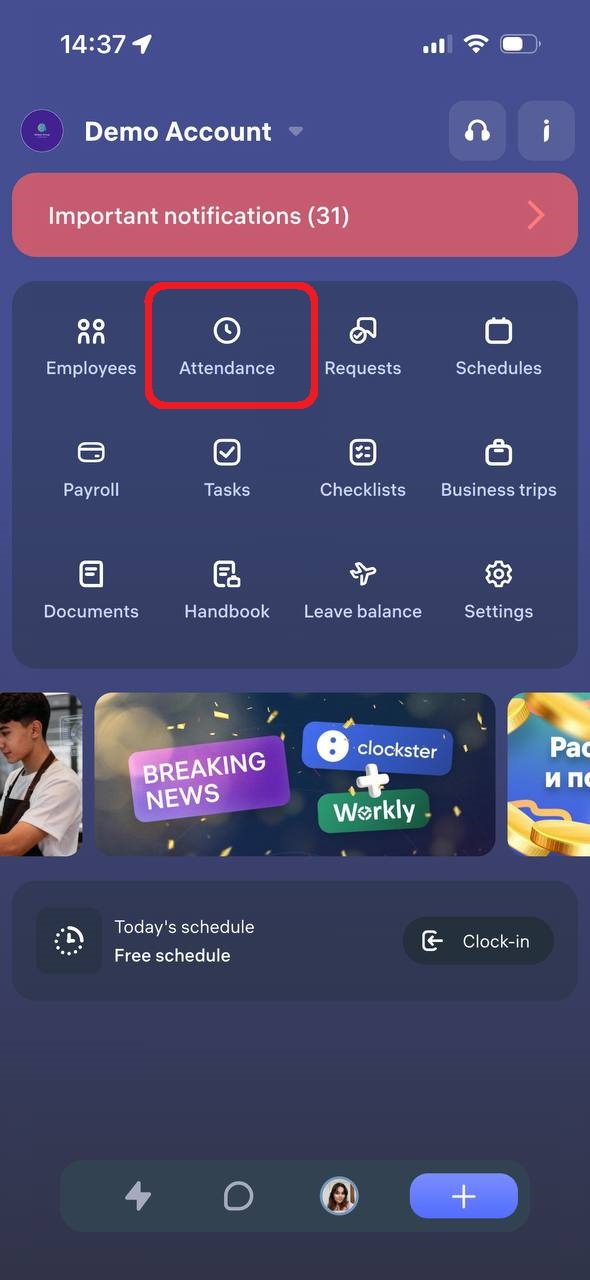
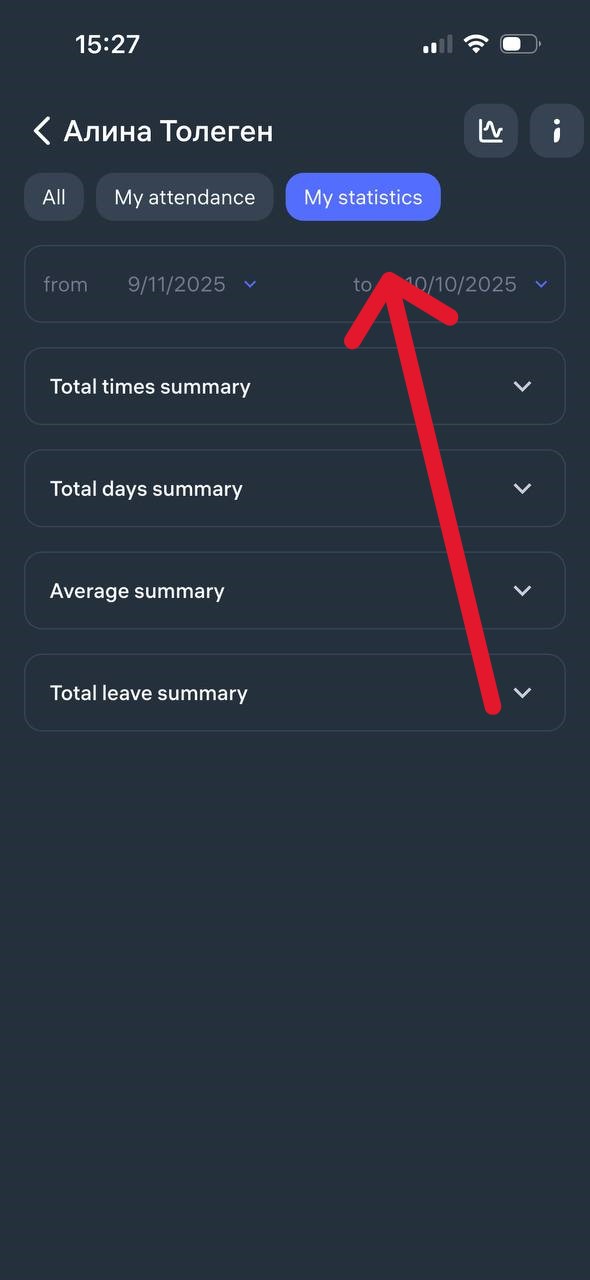
An employee can open the Clockster mobile app and go to the “Attendance” → “My Statistics” tab.
In the “My Statistics” section, they can view:
Total times summary
Total days summary
Average summary
Total leave summary
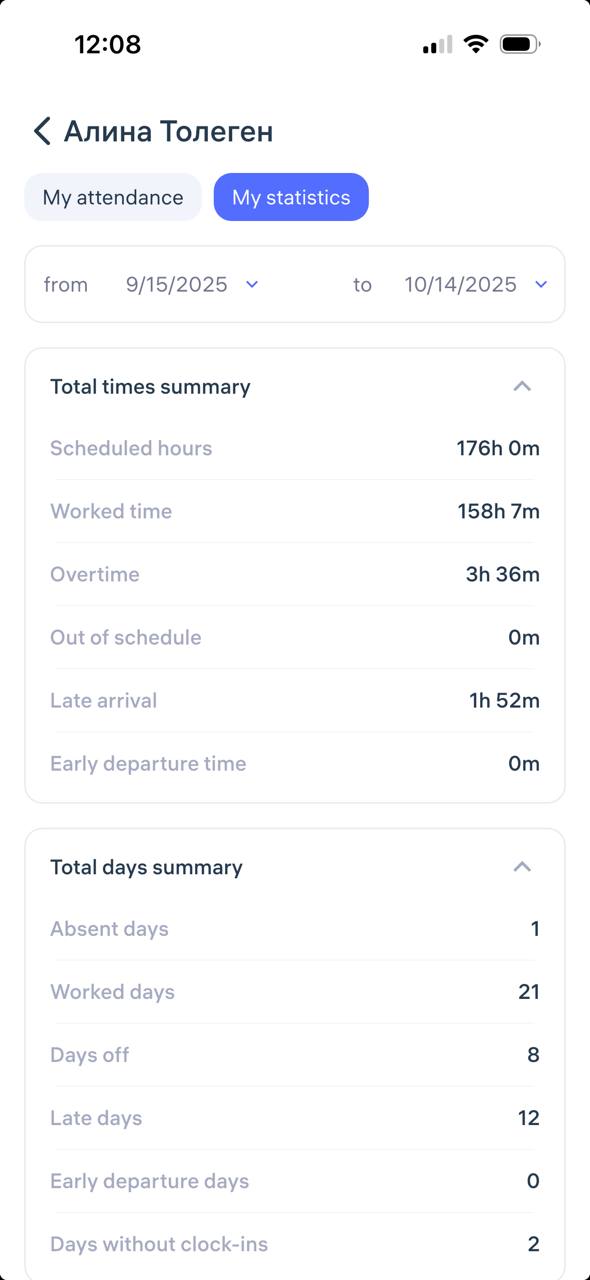
How to view your check-ins in the Clockster mobile app
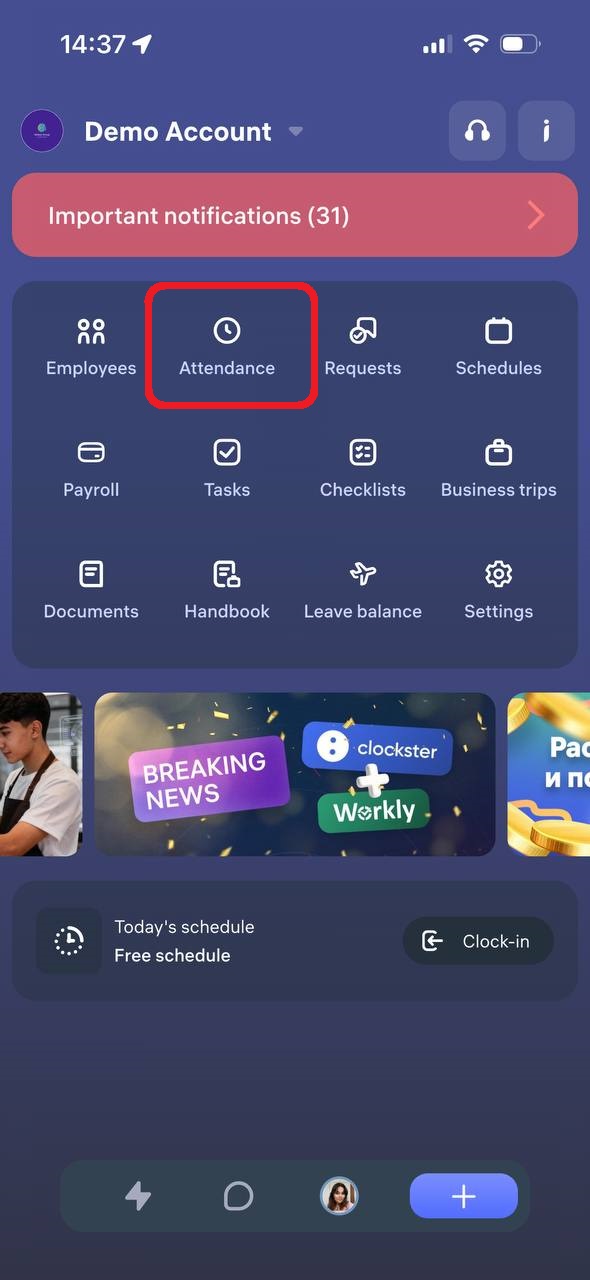
You can view your check-ins in the “Attendance” section of the Clockster mobile app.
On the main page of the app, tap the “Attendance” icon.
2. In the window that opens, select the “My Attendance” tab.
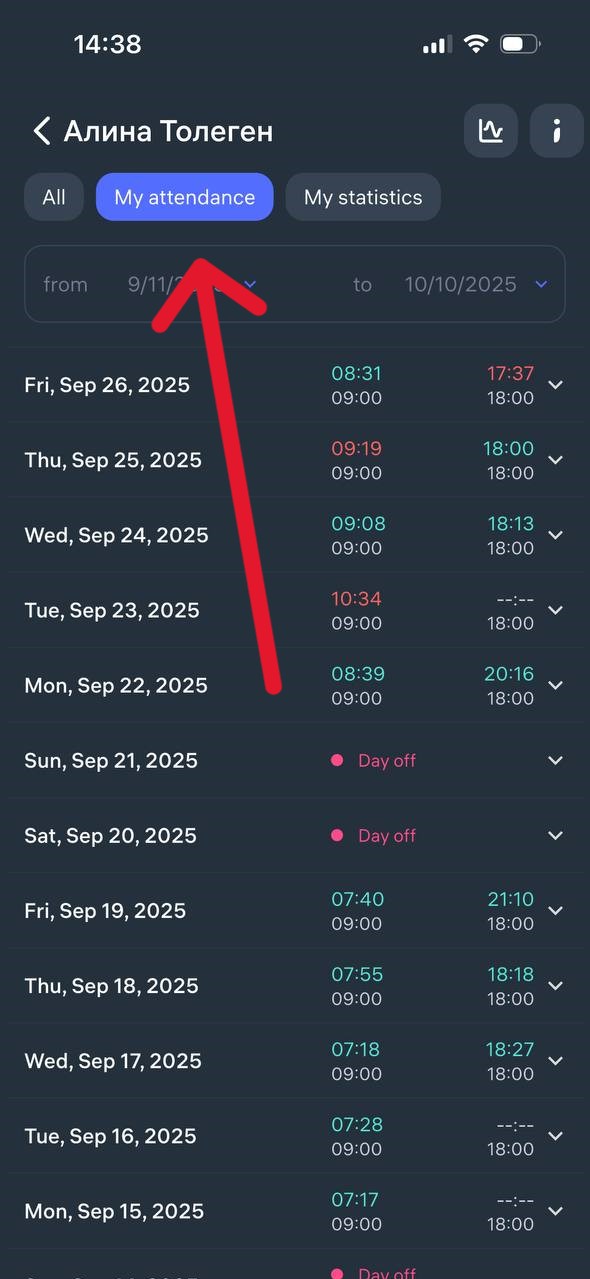
3. Here you’ll see all your check-ins for the selected period — including clock-in and clock-out times, as well as dates.
If needed, you can change the date range at the top using the filter (for example, to view attendance for a week, a month, or any custom period).
Where can I see my colleagues’ birthdays?
You can view your colleagues’ birthdays in the Clockster mobile app under the “Employees” section, in the “Birthdays” tab.
This section only shows upcoming birthdays, and the page is automatically updated on a regular basis.
If you don’t see the “Birthdays” tab, it’s possible that you don’t have permission to access this information. In that case, please contact your administrator to check whether you have access to the “Employees” section.
Which formats can I upload into Documents?
You can upload files in these formats to «Documents»:
PDF
DOC and DOCX (Word)
XLS and XLSX (Excel)
JPG
File size — up to 10 MB. If you upload several files at once, each becomes a separate document.
For registering a contract in ESUTD, the supporting document can be uploaded as PDF, JPG or PNG.
Tip. Some phones cannot open Word and Excel files without a separate app. To make it easy for employees to read and sign a document, upload it as PDF.
How do I sign a document with an EDS (eGov)?
Documents for signing arrive in the Clockster mobile app. You will get the notification «You have received a document to sign» about a new document.
How to sign in the app
Open the document from the notification, from the «Documents» tile on the home screen or from «Profile → My documents».
Read the document: tap the file. You can download it via the «⋯» menu → «Download».
Tap «Sign». The eGov Mobile app opens. To sign from another device, choose «Show QR code».
Confirm the signature in eGov (PIN code or biometrics) and return to Clockster.
The check takes up to 2 minutes, then «Successfully signed» appears.
If the document only needs to be read, instead of signing there will be the «I have read and accept» button.
If you have not signed the document right away, a reminder will arrive on weekdays at about 11:15 for 7 days.
How to sign in the web version (for administrators and managers)
Open «Documents → With employees» and turn on «Awaiting my signature».
Click «Sign» in the document row and choose a method: «Sign in eGov Mobile / Business» (QR code) or «Sign in NCA Layer» (key file on the computer).
Several documents at once: select them and click «Sign selected».
If it does not work
«It is not your turn to sign this document yet» — the document is still being approved or signed by others. Wait for the notification.
«Certificate IIN/BIN does not match the expected signer» — you signed with the wrong key or the IIN in your profile is wrong.
«The certificate is invalid or has expired» — reissue your EDS key.
«eGov side issues» — sign again.
What can I do in the “Employees” section?
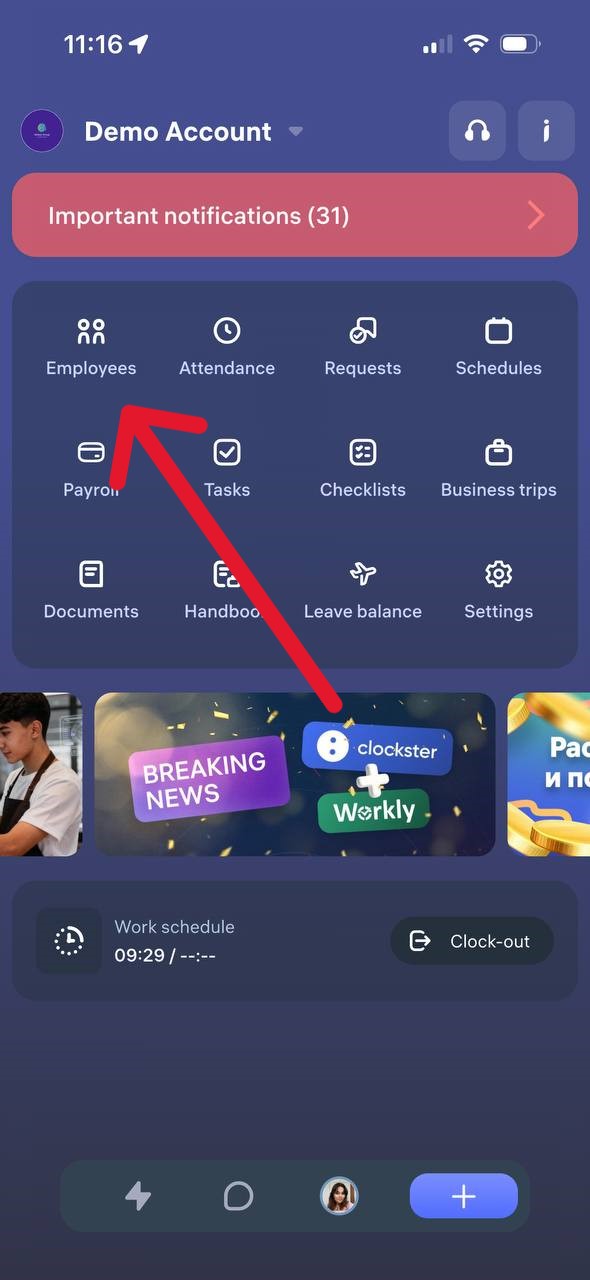
When the “View the list of employees” permission is enabled, the “Employees” section in the Clockster mobile app provides the following features:
View Employees
You can open the list of all active company employees.
The list displays names, positions, and initials.
View Birthdays
A separate tab shows upcoming employee birthdays.
Search and Filter
You can search by an employee’s first or last name and use filters by location.
Employee Profile Card
By tapping on an employee’s name, you can open their profile card, which displays:
phone number (if specified)
gender
employee number
department
position
main and additional locations
This information helps you quickly find the right colleague and access their basic details.
Can I add another employee (my colleague) into the company where I’m employed?
No, in Clockster, only the administrator has the ability to add employees.
How do I create a request for Advance payment?
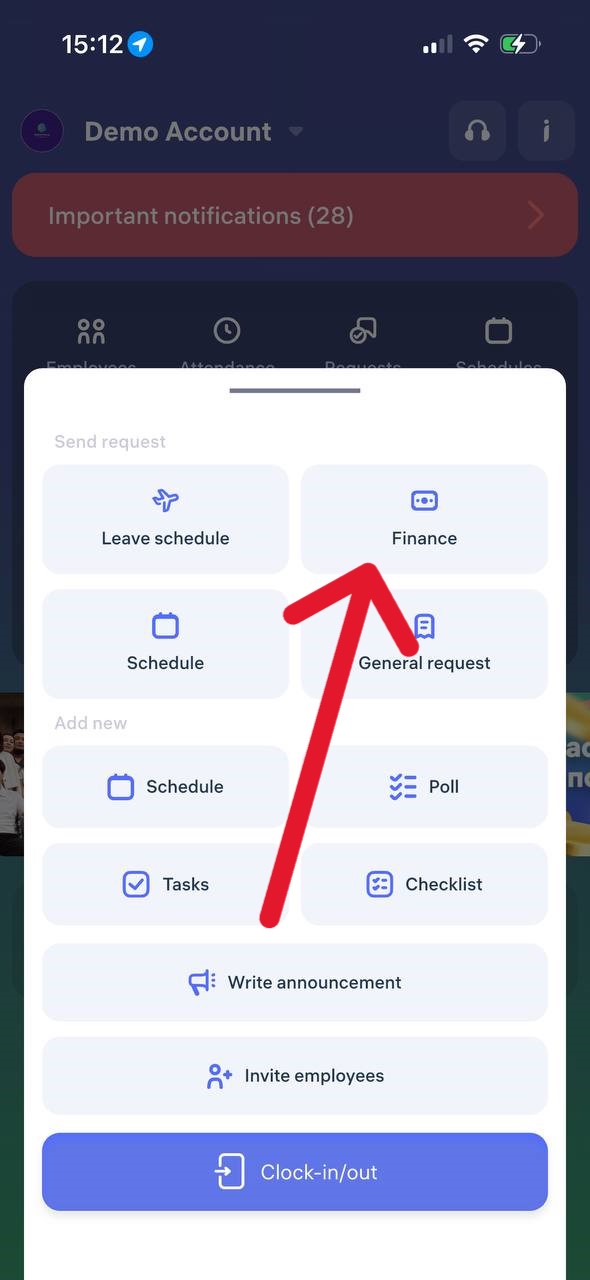
Open the Clockster mobile app.
On the main page, tap the “+” button at the bottom of the screen.
In the menu that appears, select “Finance”.
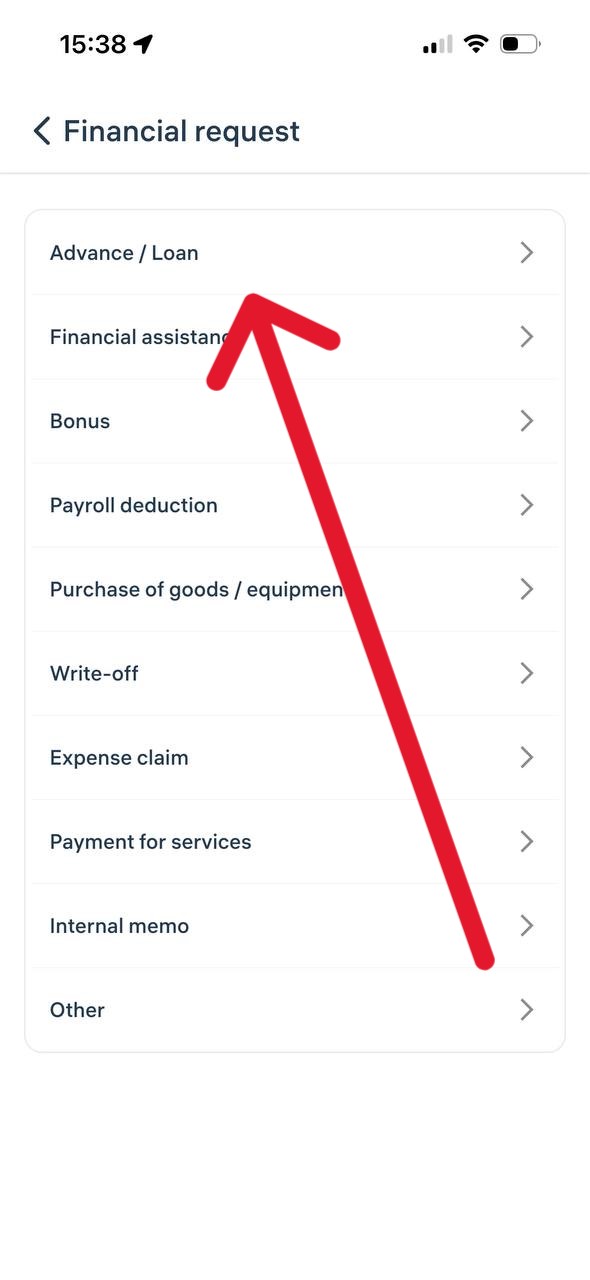
A list of financial request categories will open.
Choose the desired category, for example “Advance / Loan”.
Fill in all the required fields in the form (amount, description, and other details if necessary).
Tap “Send Request”.
Important:
– All financial requests are sent to your administrator or manager for review.
– You can track the status of your request in the “Requests” section to see whether it has been approved or not.
How to create a request for a photo so that a biometric device recognizes it?
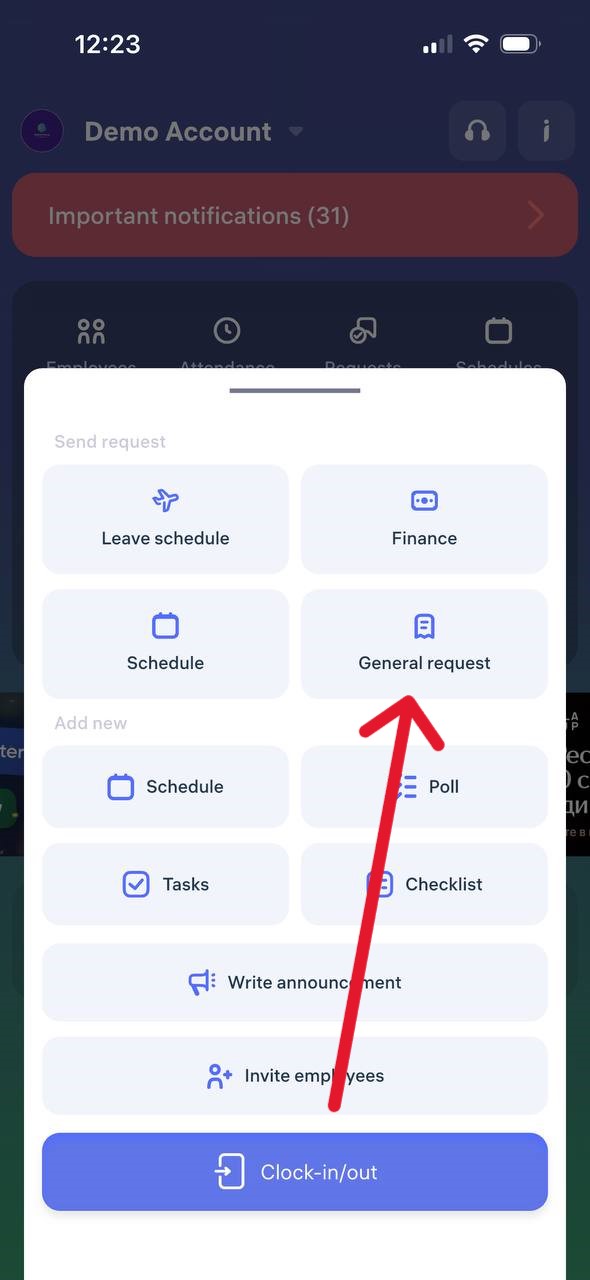
Step 1. Open a General equests
Open the Clockster app, tap the “+” button on the main screen, and select “General Request”
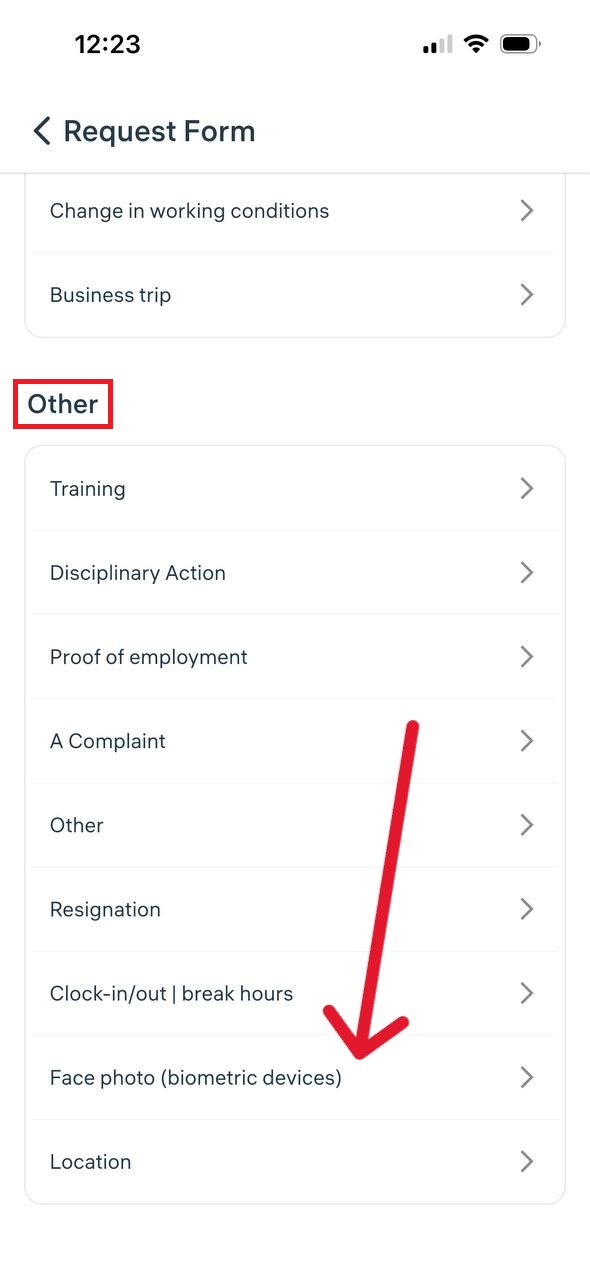
Step 2. Find the required request type
Scroll down the list of request types and select “Face photo (biometric devices)”
Step 3. Upload a photo and select a manager
Attach a proper photo (face centered, no headwear, neutral background).
Select the responsible manager (up to two can be chosen — for example, a director and an administrator).
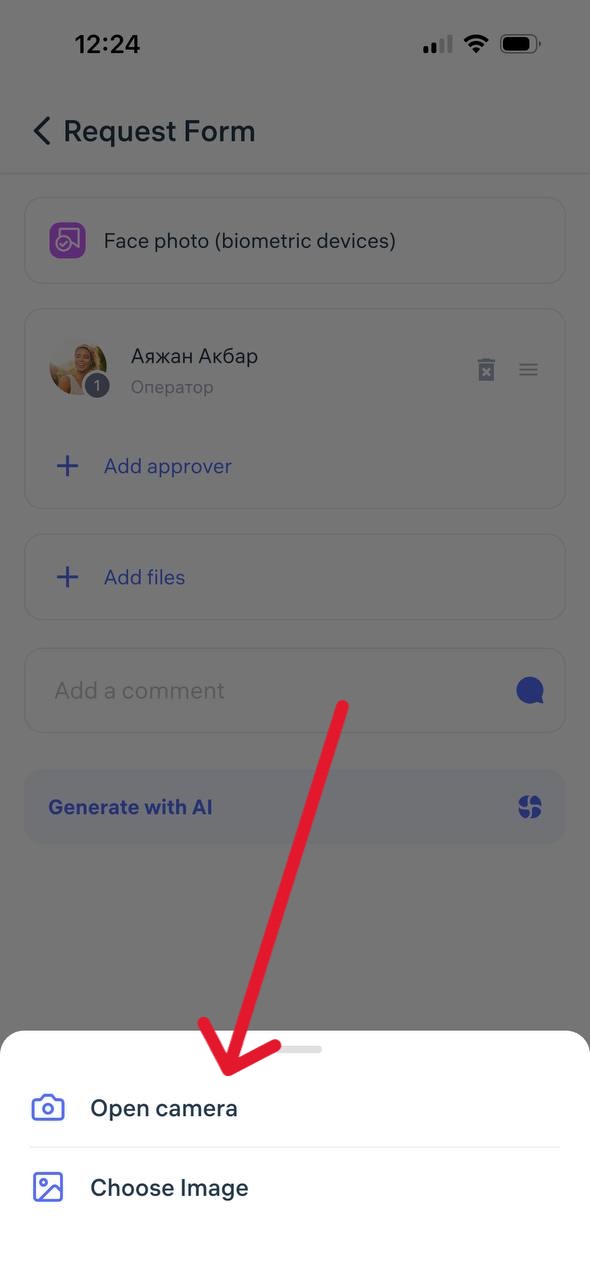
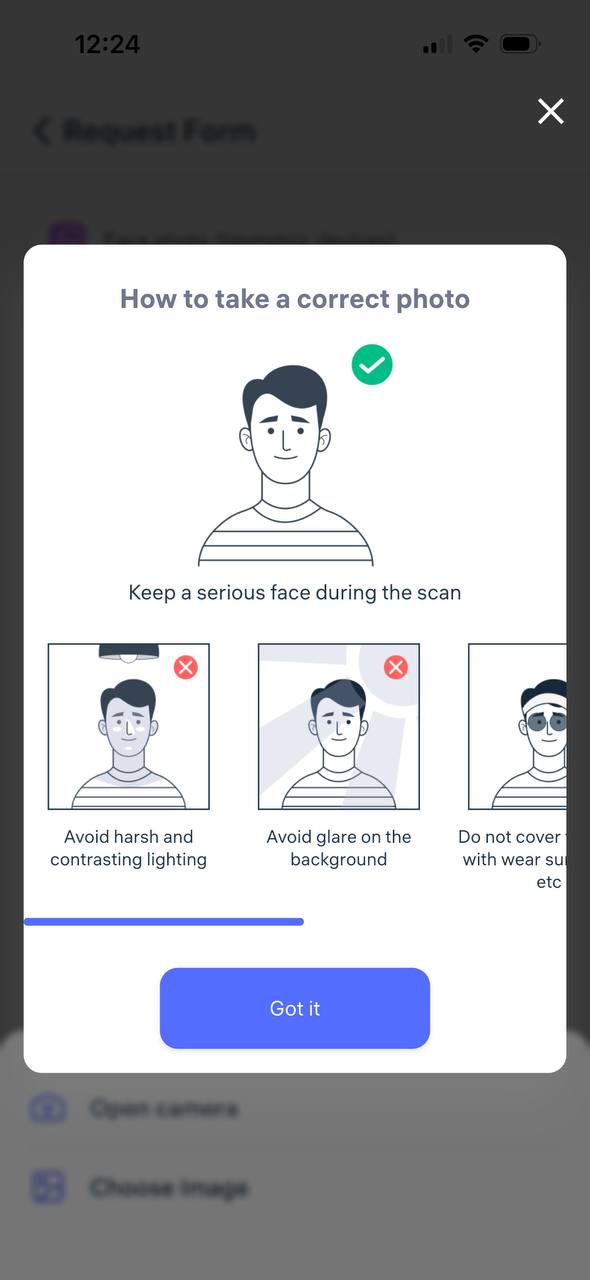
Step 4. Submit the request
Add a comment if needed and tap “Send request” The request will appear in the General Requests section and will be reviewed by the manager.
What happens next?
A push notification will be sent once the photo is approved or rejected.
After approval, the photo will be added to the system and used on the company’s biometric devices.
The app is properly installed, I am inside my account. How do I make clock-ins/outs?
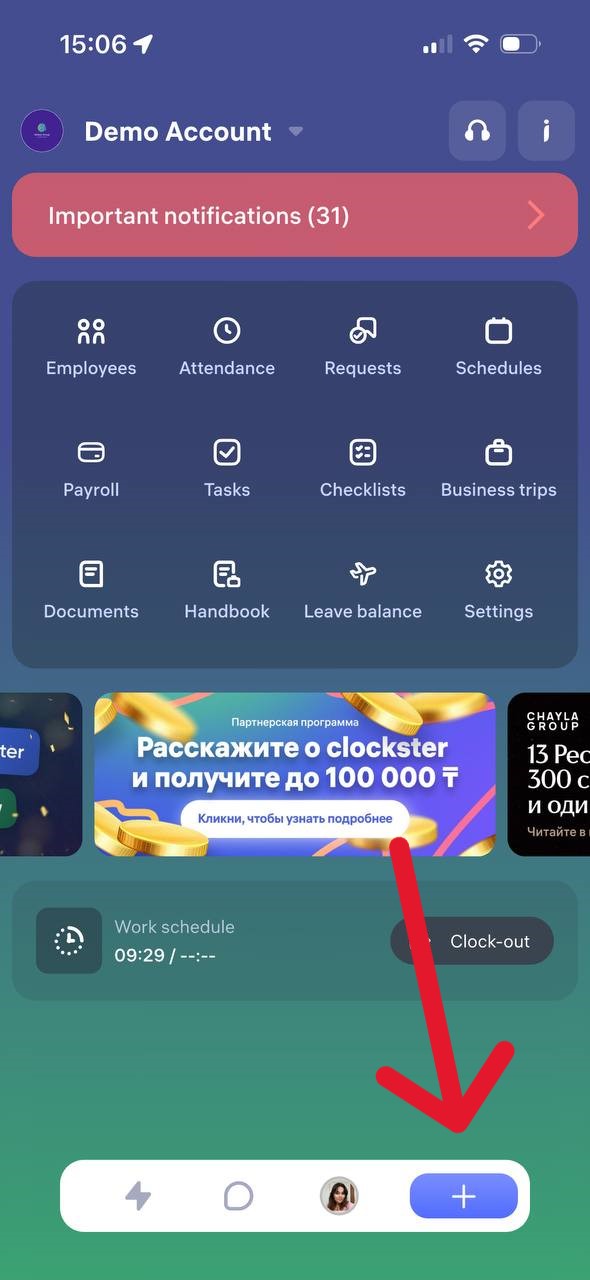
How to Clock In or Clock Out in the Clockster App
On the main page of the app, tap the “+” button at the bottom of the screen.
Select “Clock In/Out”
Tap “Clock In” or “Clock Out” depending on what you need to mark.
What to Remember:
– Make sure your location services (GPS) are enabled on your phone. Without it, the clock in/out may not be recorded.
– Important:
If you make only one mark — for example, only “Clock In” or only “Clock Out” — the day will not be counted as a full working day. The report will show incomplete hours.
To ensure your working hours are recorded correctly, you need to make both marks each day: “Clock In” and “Clock Out.”
– The app will offer you to send a request for missed clock-ins/outs for the last 14 days.
We recommend always sending such requests to keep your data complete.
– The app has a reminder feature for clock-ins/outs. Notifications are sent:
• 5 minutes before the start of your shift
• At the start of your shift
• 5 minutes after the start of your shift
The same notifications are sent at the end of the working day so you don’t forget to clock out.
Note:
Notifications work only if a work schedule has been created for you in the Clockster system.
What’s an additional record and how to use it?
An additional clock-in is a special type of attendance mark that allows an employee to send an extra location update during the workday. It is only available after the employee has marked “Clock-in” but before they have marked “Clock-out.”
When it is used:
When it’s necessary to send an intermediate clock-in during the workday.
When the company requires tracking location throughout the shift.
When an employee moves between different work sites.
How to create an additional clock-in?
Open the Clockster mobile app.
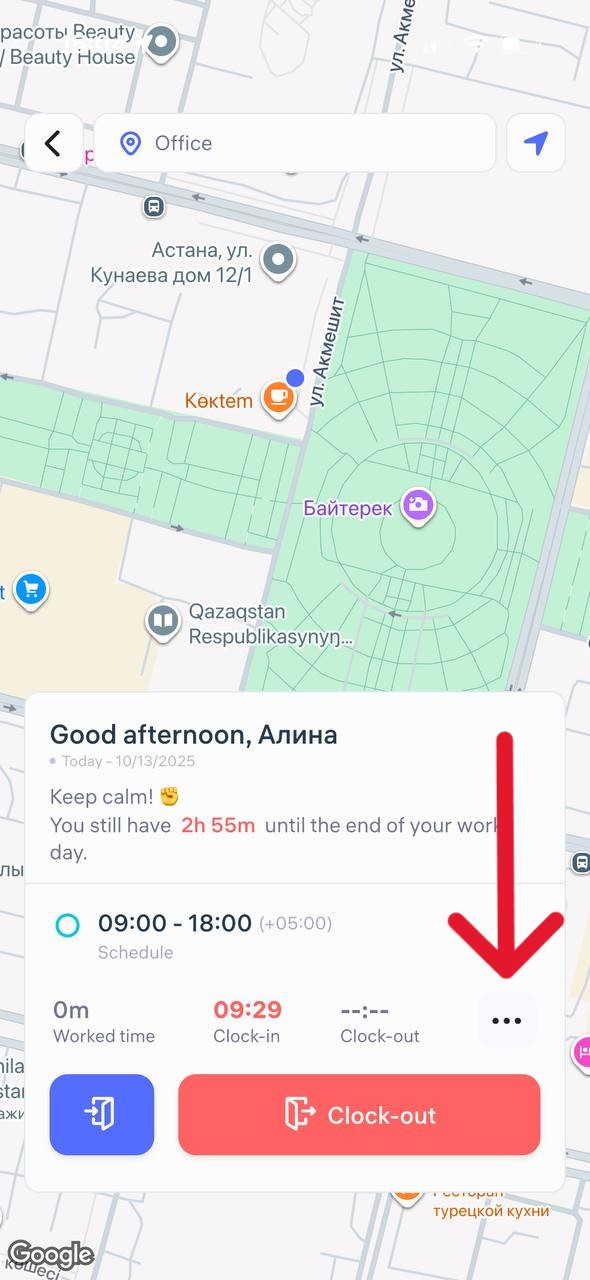
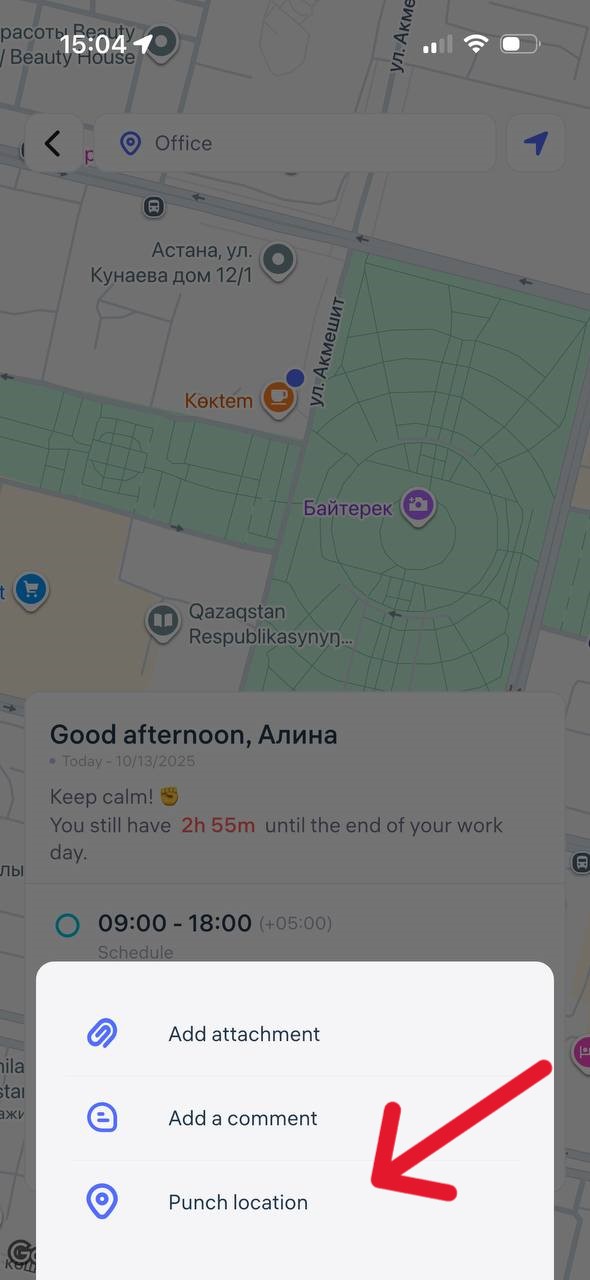
After marking “Clock-in,” a button with three dots (⋯) will appear on the main screen next to the main buttons.
Tap it and select “Punch location”
Add a comment (if needed).
Attach a photo or file, if required.
The system will automatically record your location and the time of the check-in.
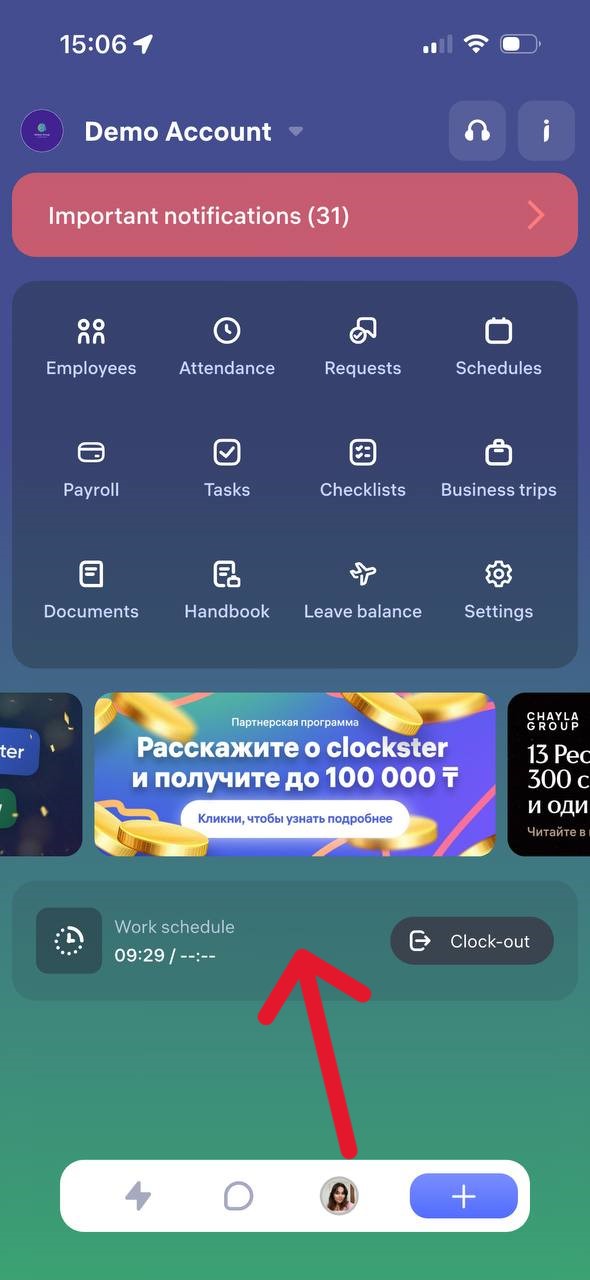
Important
The additional clock-in is treated as a “Clock-in” type but does not close the workday.
It does not replace the main “Clock-out” mark.
Having an additional clock-in does not affect the calculation of working hours.
How to switch between profiles?
Each Clockster user initially has a personal profile — this is a profile not linked to any company. In it, the user provides basic information such as full name, photo, contact details, and other personal settings.
When the user joins at least one company (a Clockster client), an employee profile is automatically created for that company. This profile gives access to all Clockster features, including:
Clock-in and clock-out tracking,
Submitting requests (for leave, sick days, etc.),
Viewing personal statistics and schedules.
If the user works for multiple companies, switching between profiles is simple depending on the context or task.
In the mobile app
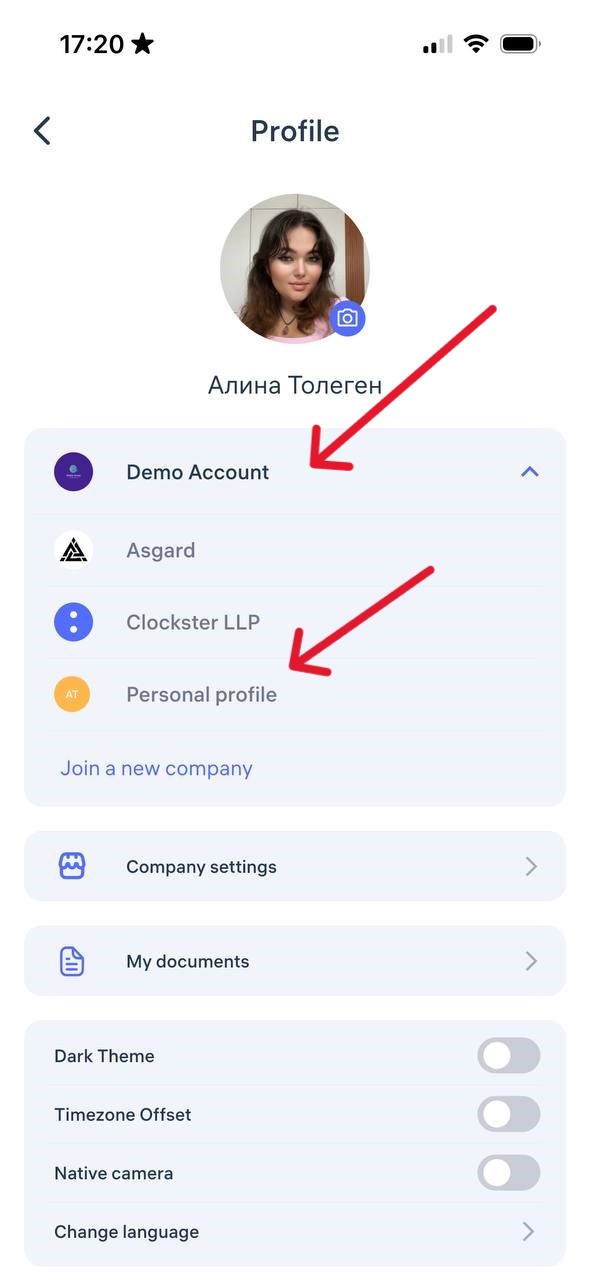
Go to the Profile section — the button is in the bottom-right corner.
At the top, you’ll see a list of all available profiles: the names of companies you’re connected to and your personal profile.
Tap the desired profile — the app will instantly switch to that work environment.
In the web version
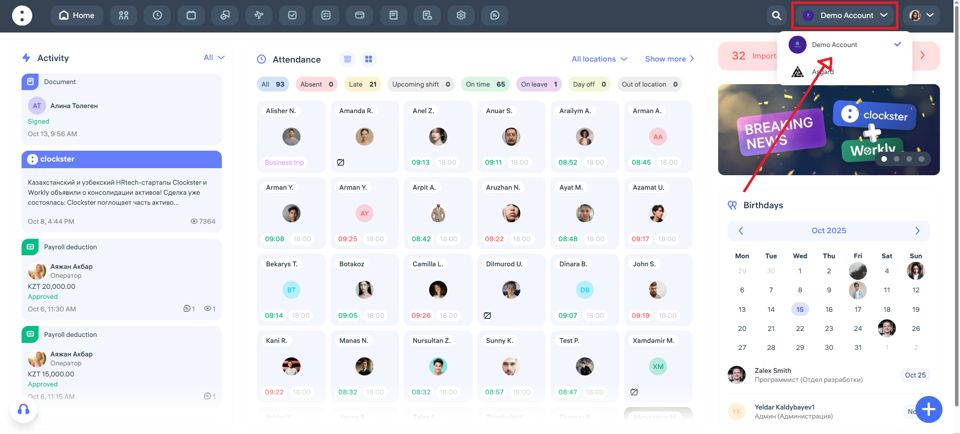
In the top-right corner, click on the name of the current company.
From the drop-down list, select the desired organization or personal profile.
To access personal profile settings (change photo, language, theme, etc.), click your name in the top-right corner.
💡 Note: Actions and data are not shared between companies. Each profile has its own record of attendance, requests, and schedules.
What is located on the Home page?
What’s Inside Each Section of Clockster
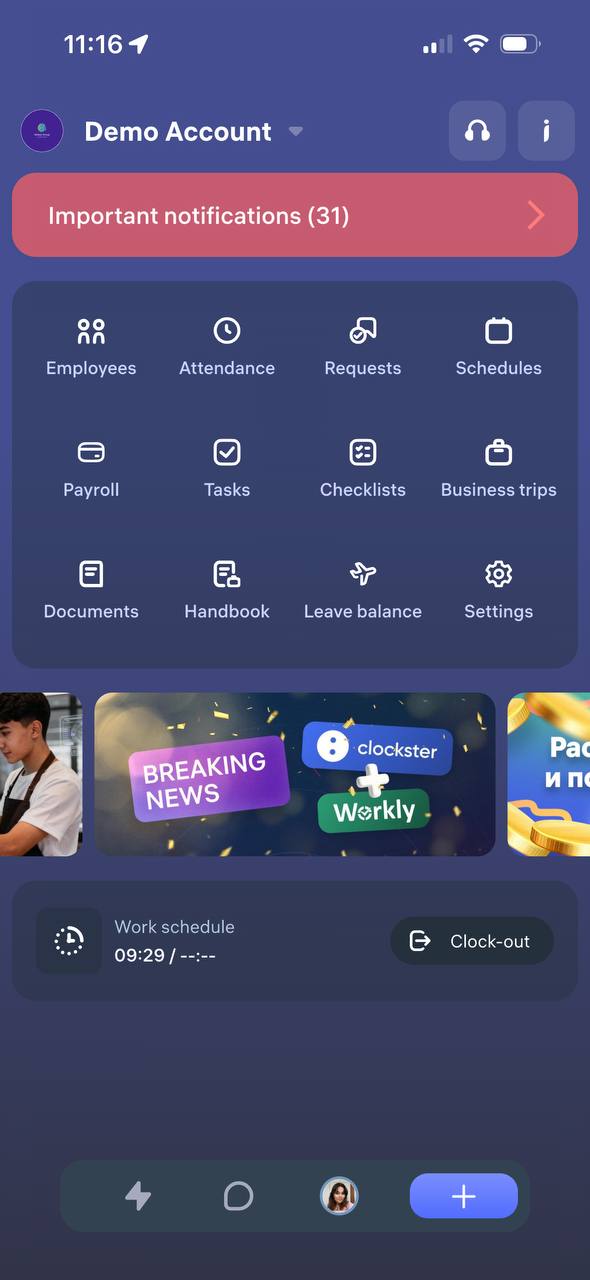
“Colleagues” section
Displays a list of all company employees. You can see each colleague’s position, department, and contact details.
“Attendance” section
Shows your check-in and check-out times, breaks, late arrivals, overtime, and the total number of hours worked.
“Requests” section
Here you can send requests to your manager — for vacation, sick leave, day off, overtime, or other internal approvals.
“Schedule” section
Displays your work schedule, showing which days are work shifts, days off, and public holidays.
“Payroll” section
Shows your earnings and deductions, the final payout amount, and your payment history.
“Tasks” section
Contains assignments from your manager. You can accept tasks, complete them, and mark them as done.
“Checklists” section
Includes step-by-step instructions for performing work processes.
You can mark items as completed — for example, when opening or closing a shift.
“Business Trips” section
Tracks your business travel requests. You can submit a new trip request or view details of approved trips.
“Documents” section
Contains the company’s internal documents such as orders, instructions, policies, and guidelines.
You can open and read documents directly in the app.
It also includes personal employee documents uploaded from your mobile gallery.
“Handbook” section
Provides useful information, including: SOPs, Company organizational structure, Banners, Announcements, Surveys
“Leave Balance” section
Shows how many vacation days you have for the current year, how many you’ve already used, and how many remain available.
It also displays your contract start date, sick leaves, and unpaid leaves, among other related data.
How do I create an absence request?
In Clockster, you can quickly send a request for day off, sick leave, or temporary absence through the mobile app.
1. Open the Clockster mobile app
After logging into your account, on the main screen, tap the “+” button at the bottom of the screen.
2. Select the request type
On the request selection screen, tap “Leave Schedule.”
3. Fill in the request details
Choose the reason for absence: sick leave, day off, unpaid leave, etc.
Specify the start and end dates.
If you selected “Partial day leave” specify the exact start and end time.
Assign the responsible manager who will approve your request.
Optionally, you can:
Add a photo/file (for example, a medical certificate);
Write a comment (reason for absence, additional notes, etc.).
4. Submit the request and wait for a response
Once the request is created, it will be sent to the selected manager for review.
The manager will receive a notification and can either approve or reject your request.
You will receive a push notification on your phone with the decision.
5. Track the status of your request
Go to the “Absence” tab.
Use filters: “Pending,” “Approved,” “Rejected” to quickly find the request you need.
Important to know:
The “Partial day leave” reason is not suitable for a full-day request. It is only intended for short-term absences (for an hour, several hours, or half a day).
If you need to be absent for a full day or several days, select “Day off“, “Sick leave,” etc.
How to Check Your Payslip
Opening the Payslip:
Go to the “Payroll” section in the mobile app.
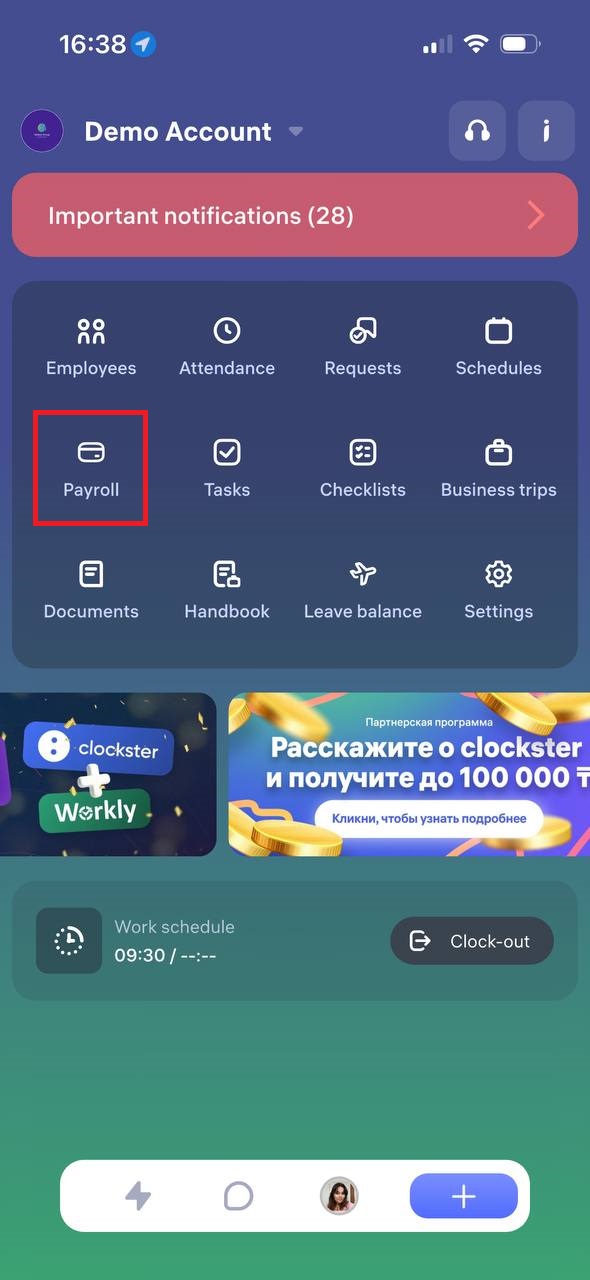
Viewing Details:
Your payslip displays the following information:
Income: salary, bonuses, additional payments (e.g., sales plan, holidays).
Deductions: fines, taxes, pension, and medical contributions.
Net pay: the final amount you will receive.
Company expenses: the total cost incurred by the employer (visible to employees for transparency).
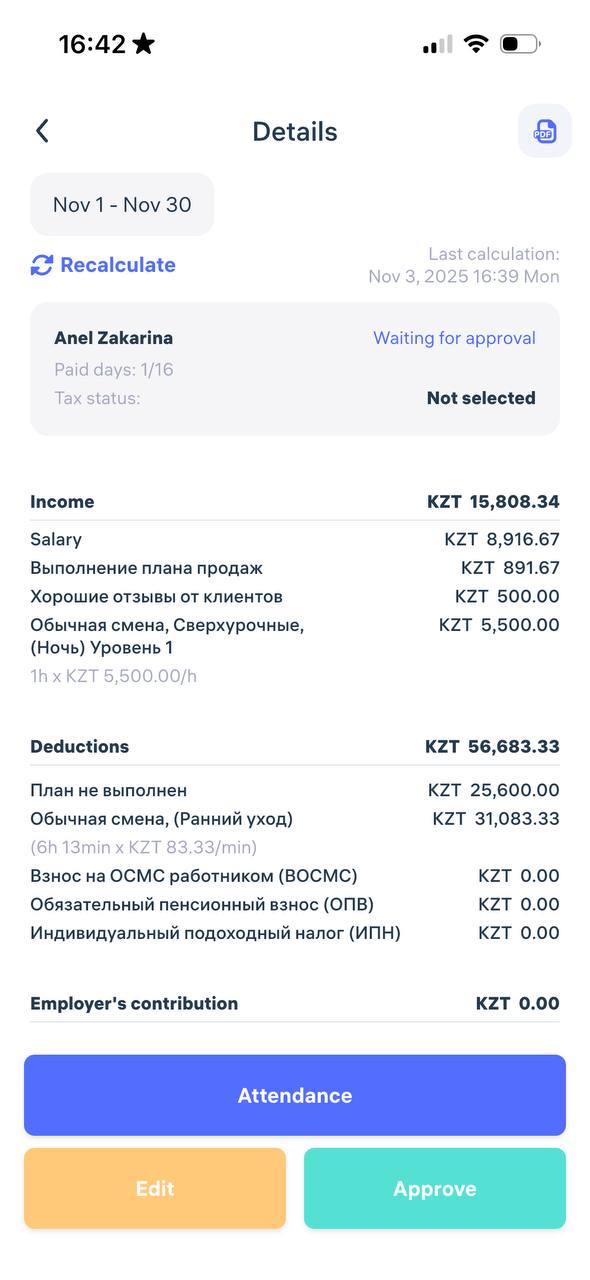
If your payslip is unavailable or the data seems incorrect, please contact your company’s accountant or HR department.
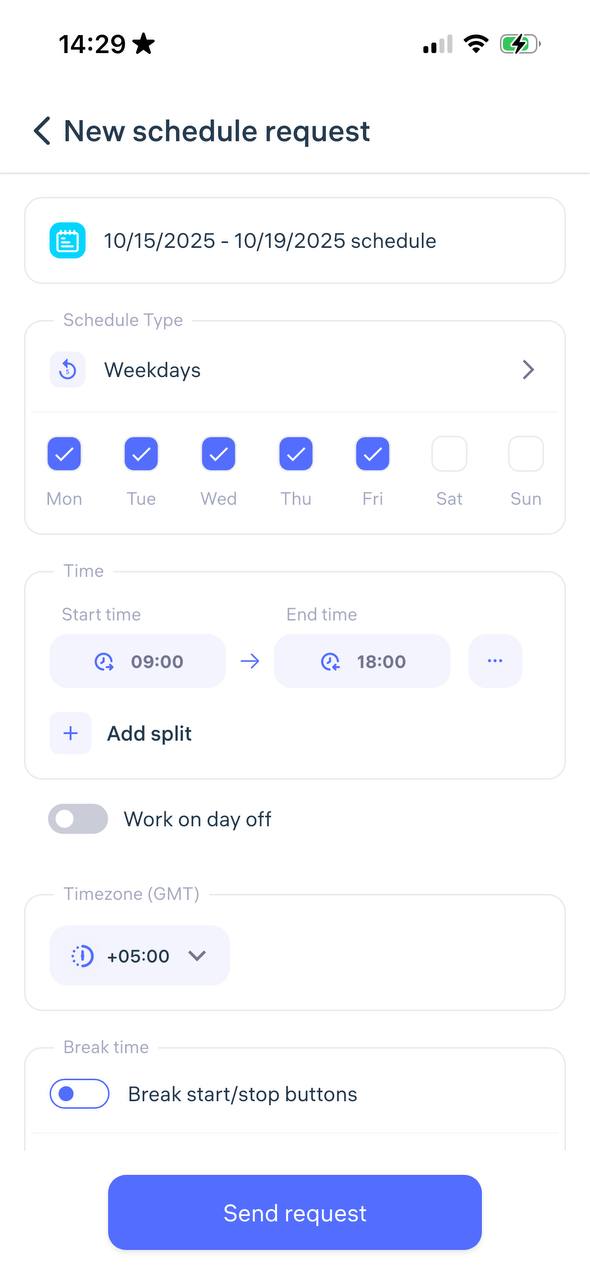
How do I submit a request to create a work schedule?
Employees can send a schedule creation request directly through the Clockster mobile app.
This feature is useful for shift work, rotational schedules, or individual work hours.
Step 1. Open the request
Open the Clockster mobile app.
On the home screen, tap the “+” button.
Select the “Schedule” section.
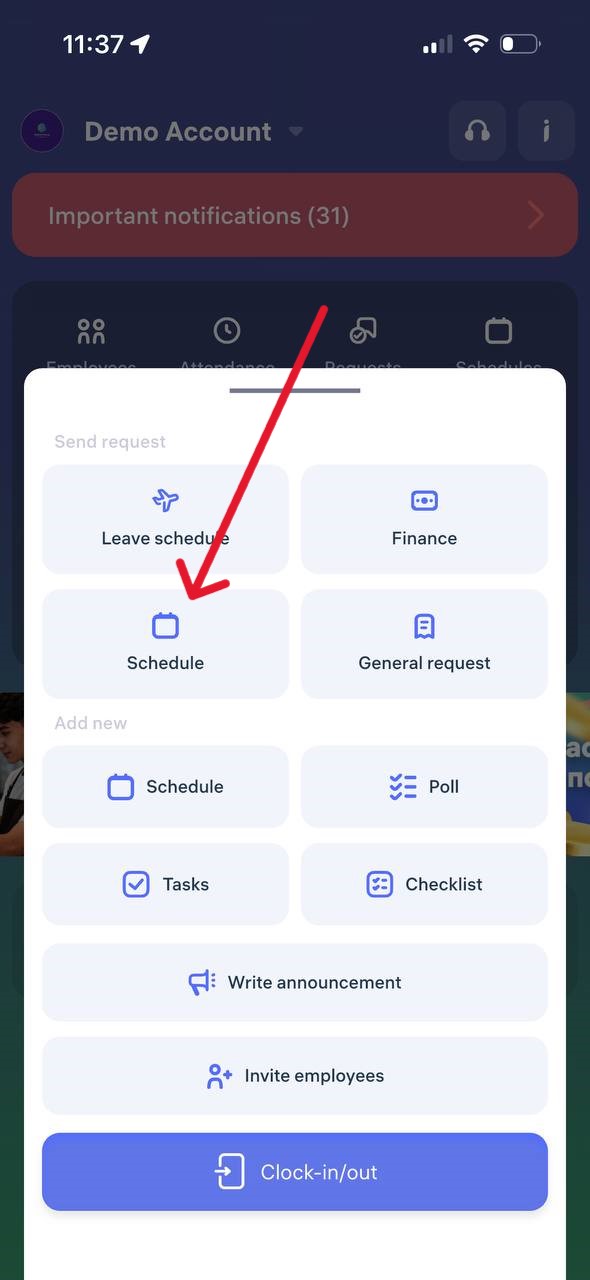
Step 2. Select the schedule period
For a period — if the employee works several days in a row (e.g., from 07.02.2025 to 10.12.2025).
Specific dates — if only certain days need to be set (e.g., March 1, March 10, March 30).
Tap “Next.”
Step 3. Set up repetition
Weekdays — for standard schedules (e.g., 5/2, 6/1).
Alternation of days — for shift or rotational work (e.g., 2/2, 14/14).
Step 4. Choose time
Specify:
working hours (start and end of the workday),
correct time zone,
lunch break duration (in minutes).
Step 5. Assign managers and add a comment
Select one or two managers who must approve the schedule (e.g., a director and an administrator).
Add a comment if needed.
Tap “Send request”
It’s recommended not to change additional settings unless you know their purpose.
Step 6. Wait for approval
After submitting the request:
You’ll receive a push notification once it’s approved or rejected.
The request status can also be tracked in the Feed on the app’s home page.
How an employee’s rating is calculated?
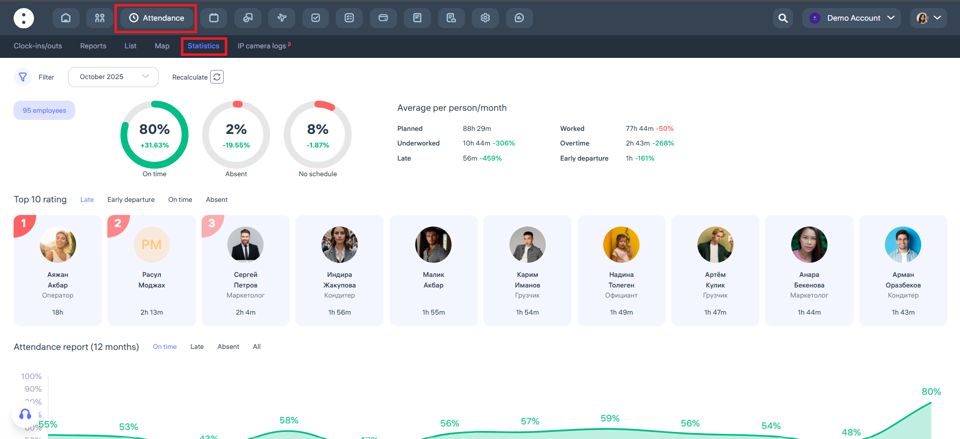
How the Employee Rating is Calculated in Clockster
The employee rating in the “Attendance → Statistics” section is calculated based on the total time of late arrivals, early departures, and absences recorded by the system.
The following parameters affect the rating:
Late arrivals – how many minutes or hours an employee arrived later than the scheduled time.
Early departures – how much earlier the employee left work before the end of the scheduled workday.
Absences – days or hours when the employee had no clock-in or clock-out records.
On time – the percentage of attendance without violations. This indicator positively affects the rating.
Calculation principle:
The fewer violations, the higher the employee’s rating. Therefore, an employee with fewer late arrivals, early departures, and absences will have a higher rating.
“Top 10 Rating” section:
This section displays a list of employees with the best attendance performance. For example, if one employee was late for 1 hour and 44 minutes during the month, their rating will be lower than that of an employee with less total lateness.
Where to find it:
Go to “Attendance” → “Statistics.”
At the top, you’ll see charts showing attendance percentages, and below — the Top 10 list of employees.
My statistics
The “My Statistics” section in Clockster displays a summary of your attendance for a selected period.
What you can see in the statistics:
Planned hours — the number of hours you were scheduled to work.
Worked hours — the actual number of hours you worked.
Overtime — the number of hours worked beyond your schedule.
Worked on weekends — shows if you worked on non-working days.
Late time — the total time you arrived late to work.
Early departures — the total time you left earlier than the end of your shift.
Additional information available:
Total days summary — details for each individual day.
Average summary — average working hours.
Total leave summary — displays weekends and public holidays.
Where to find it:
Go to the “Attendance” section.
Select the “My Statistics” tab.
Set the desired period (select the start and end dates).